Why Is My Flashlight Not Working? Quick Solutions 2026
Why is my flashlight not working is one of the most frustrating questions you can ask when you need light most — during a power outage, a camping trip, or an emergency.
The good news is that most flashlight failures come down to a small number of fixable causes.
Whether it is a physical flashlight with dead batteries, corroded contacts, or a blown bulb, or a phone torch that has gone dark due to a software glitch or hardware damage.
How a Flashlight Works: The Basic Circuit

Before diagnosing why your flashlight is not working, it helps to understand its basic mechanics.
A flashlight is a simple electrical circuit. Power flows from the batteries, through metal contact points, through the switch, to the bulb or LED, and back to the battery.
If any single point in that circuit breaks — a dead battery, a corroded contact, a bent spring, a burned-out bulb — the whole circuit fails. That is why most flashlight problems are easy to trace once you know the circuit.
The Most Common Reasons a Flashlight Stops Working
Most flashlight failures fall into a short list of predictable causes. Knowing these upfront saves you time and eliminates guesswork.
Here is a full overview:
| Cause | How Common | Difficulty to Fix |
|---|---|---|
| Dead or weak batteries | Very common | Easy |
| Wrong battery orientation | Common | Easy |
| Corroded battery contacts | Very common | Easy |
| Faulty or stuck switch | Common | Easy to moderate |
| Damaged or burned-out bulb | Moderate | Easy to moderate |
| Weak or flattened battery spring | Moderate | Easy |
| Water or moisture damage | Moderate | Moderate |
| Damaged internal wiring | Less common | Difficult |
| Lockout mode activated | Common (tactical lights) | Easy |
| Driver circuit failure | Less common | Difficult |
Reason 1: Dead or Weak Batteries
The number one reason a flashlight is not working is dead or discharged batteries. It sounds obvious, but it is the cause in the majority of cases.
As batteries discharge, they release less and less power. Most flashlights will dim gradually before going out entirely. If the light is fading rather than simply off, weak batteries are almost certainly the problem.
Even if the flashlight has not been used for a long time, batteries stored inside can slowly self-discharge — especially in warm storage environments. Always keep spare batteries in a cool, dry place and replace them at the first sign of dimming.
How to Fix Dead Batteries
Remove the old batteries completely. Check the expiry date if visible.
Insert a fresh set of the correct battery type — AA, AAA, CR123A, 18650, or whatever your flashlight requires. Make sure they are a quality brand rather than cheap, generic alternatives.
If the flashlight works with new batteries, the fix is done. If it still does not turn on, the problem lies elsewhere in the circuit.
Reason 2: Batteries Installed in the Wrong Orientation
Wrong battery orientation is one of the most common and easily overlooked causes of a flashlight not turning on. Batteries must be inserted with the positive end (+) and negative end (−) aligned correctly with the markings inside the battery compartment.
This mistake happens often in low light conditions — which is ironic, given that you usually need a flashlight when it is already dark.
Check the compartment carefully. There are usually + and − symbols molded into the plastic. Flip any battery that is facing the wrong direction and test again immediately.
Reason 3: Corroded Battery Contacts
Corrosion is one of the most damaging and common causes of a flashlight not working, especially in flashlights that have had batteries left inside for extended periods.
When batteries leak, they release acidic or alkaline chemicals that coat the metal contact points inside the flashlight. This coating blocks the electrical current and breaks the circuit.
You can identify corrosion by a white, green, or blue powdery residue around the battery terminals or on the metal contacts inside the compartment.
How to Clean Corroded Contacts
Remove the batteries and dispose of them safely. Dip a cotton swab in white vinegar or isopropyl rubbing alcohol.
Gently scrub the corroded contacts with the swab. For heavy corrosion, use a small piece of fine-grit sandpaper or an emery board — but scrub lightly to avoid removing too much metal.
Wipe everything completely dry before inserting fresh batteries. Let the compartment air dry for a few minutes first.
Reason 4: Faulty or Stuck Switch
The power switch in a flashlight contains two small metal contact strips. When you press the switch, these strips connect and complete the electrical circuit.
Over time, the strips can corrode, bend, get stuck, or stop making a clean connection. A switch that feels mushy, does not click properly, or is unresponsive is a clear sign of a contact problem.
Try clicking the switch rapidly several times in a row. This can loosen internal dust or debris that is interfering with the connection. For tail-switch models, unscrew the tail cap and press the switch directly to test it.
How to Fix a Faulty Switch
Use compressed air or an electronics contact cleaner spray to clean around the switch. For switches that are visibly corroded, a small amount of isopropyl alcohol on a cotton swab can help.
If the switch is physically damaged or broken, it may need to be replaced. Advanced users can test the switch with a multimeter to confirm whether current is flowing when the switch is engaged.
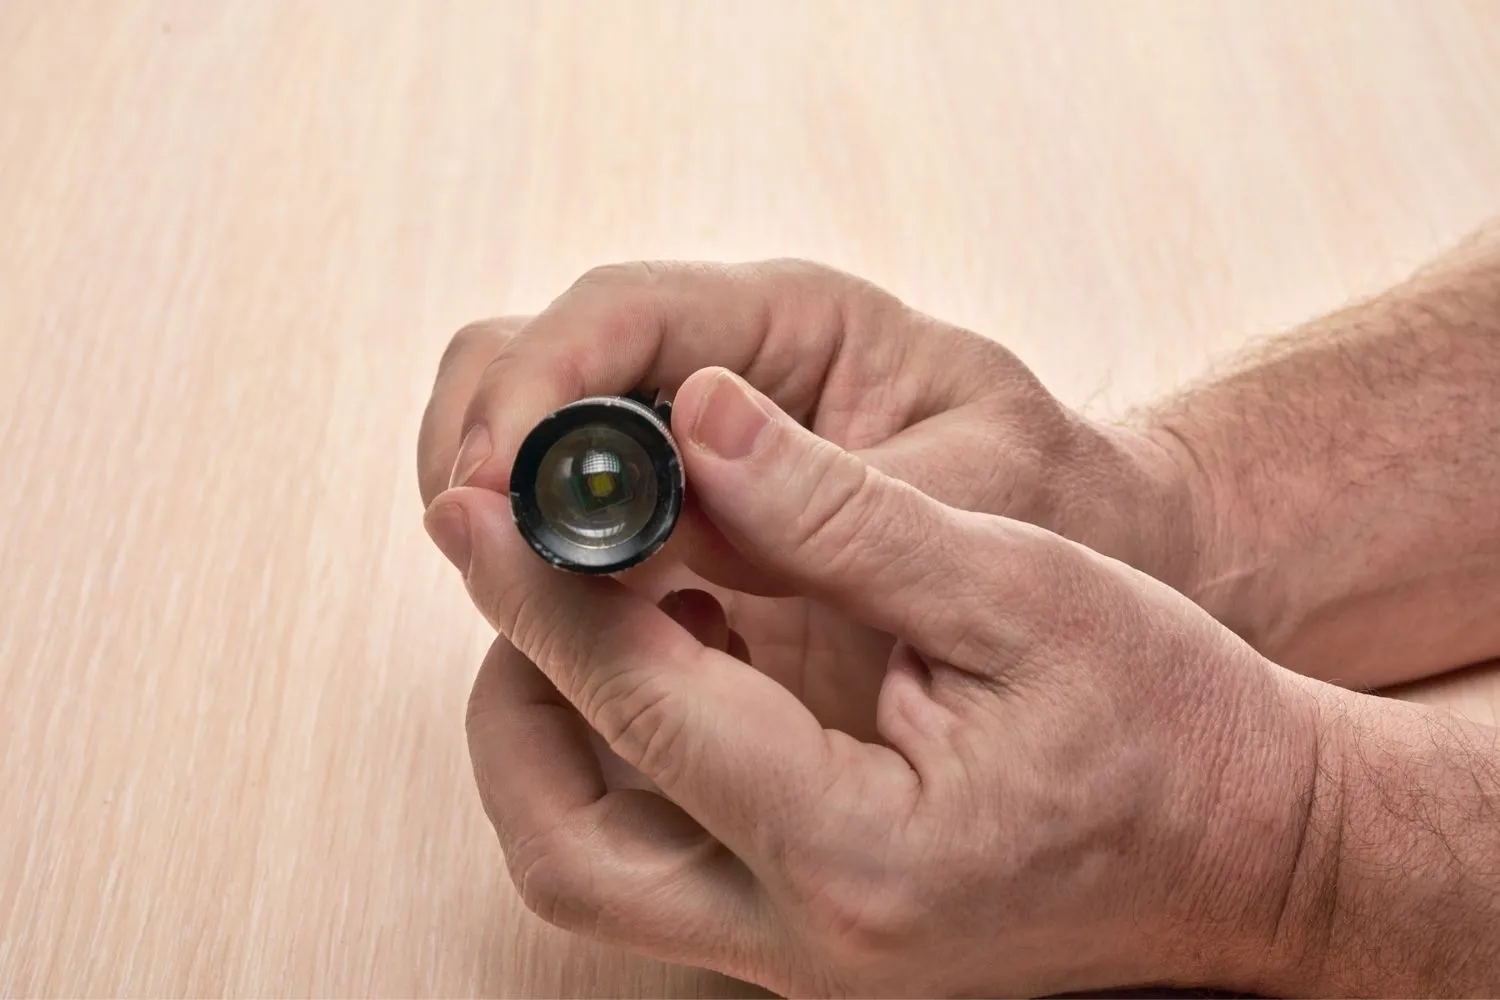
Reason 5: Burned-Out Bulb or LED
Traditional incandescent flashlight bulbs have a thin filament inside. When this filament burns out or breaks, the flashlight stops working immediately.
LED bulbs last far longer — typically tens of thousands of hours — but they can still fail due to manufacturing defects, physical damage from drops, or voltage spikes from cheap batteries.
If you have checked the batteries and the contacts and the flashlight still does not work, the bulb or LED module is the next thing to inspect.
How to Check and Replace a Bulb
For incandescent bulbs, hold the bulb up to a light source. A broken or blackened filament is clearly visible.
If the bulb is faulty, replace it with an identical replacement. Consult the user manual or manufacturer website to confirm the correct bulb type and wattage for your model.
For LED modules, some flashlights allow module replacement while others have the LED built-in permanently. If the LED is non-replaceable and has failed, the flashlight may need professional repair or replacement.
Reason 6: Weak or Flattened Battery Spring
Inside every flashlight battery compartment, there is a small metal spring at the negative end. This spring holds the battery firmly in place and maintains constant contact with the terminal.
Over time, the spring can become compressed, flattened, or weakened — especially after dropping the flashlight. When the spring loses tension, it no longer holds the battery firmly enough to maintain a consistent electrical connection.
This often produces an intermittent fault — the flashlight works when held in one position but flickers or goes out when moved or tapped.
How to Fix a Weak Battery Spring
Open the battery compartment and locate the spring at the negative end. Using a small screwdriver or similar tool, gently pull the spring outward by a few millimeters to restore its tension.
Reinsert the battery and test. If the spring is broken or too far gone to stretch, a replacement spring from a hardware store or electronics supplier can be installed.
Reason 7: Lockout Mode Activated
Many modern tactical and LED flashlights include a lockout mode — a feature designed to prevent the light from accidentally activating in a bag or pocket.
When lockout mode is engaged, the flashlight will not turn on at all, no matter how many times you press the button. This is one of the most frequently missed causes of a flashlight appearing to be broken.
The method to activate and deactivate lockout mode varies by manufacturer. Common triggers include holding the power button for 5 to 10 seconds, twisting the head slightly, or clicking a specific button sequence.
How to Disable Lockout Mode
Consult the user manual for your specific flashlight model. Most manufacturers document the lockout procedure clearly.
As a general rule, try holding the power button for five to ten seconds. On some models, partially loosening and re-tightening the head or tail cap will disengage the lockout.
If you do not have the manual, search the manufacturer’s website or the model number followed by “lockout mode” to find the correct procedure quickly.
Reason 8: Water or Moisture Damage
Many flashlights are marketed as water-resistant, but water-resistant is not the same as fully waterproof. Prolonged submersion or a cracked O-ring seal can allow moisture inside the casing.
Water inside a flashlight creates short circuits, promotes corrosion, and can permanently damage the LED driver or internal wiring. You may notice intermittent behavior, flickering, or no response at all after the flashlight has been exposed to water.
How to Fix Water-Damaged Flashlights
Remove the batteries immediately. Disassemble the flashlight as much as possible and allow all internal components to air dry in a warm, dry location for 24 to 48 hours.
Inspect the O-rings around the head, body, and tail cap. Replace any cracked or deteriorated O-rings and apply a thin layer of silicone lubricant to restore the seal. Once completely dry, reassemble and test with fresh batteries.
Reason 9: Damaged Internal Wiring or Driver Circuit

Inside the flashlight, thin wires and solder joints connect the battery contacts, switch, and LED. A drop or heavy impact can loosen these connections even when the external casing looks undamaged.
The driver circuit — a small electronic board that regulates power to the LED — can also fail due to voltage spikes, physical shock, or moisture. When the driver fails, the flashlight will not turn on or will remain extremely dim regardless of fresh batteries.
Driver circuit failure is harder to diagnose without technical knowledge. It usually requires professional repair or replacement of the driver board.
Flashlight Maintenance: How to Prevent Problems Before They Start
Prevention is always better than a repair. Regular maintenance keeps your flashlight reliable when you actually need it.
Follow these habits to extend the life of any flashlight:
Remove batteries from any flashlight that will not be used for more than a month. This prevents leakage and corrosion.
Store your flashlight in a cool, dry place away from direct sunlight and heat. High temperatures accelerate battery self-discharge and degrade O-ring seals.
Clean the battery contacts every few months with a dry cloth. If you notice any early-stage residue, address it before it builds up.
Use quality batteries from reputable brands. Cheap batteries are more likely to leak early and cause internal damage that is expensive to repair.
Phone Flashlight Not Working: Key Differences
A phone flashlight operates very differently from a standalone flashlight. On a smartphone, the torch is part of the camera module — a much more complex system involving both hardware and software.
This means phone torch failures can be caused by software bugs, app conflicts, overheating, low battery modes, or physical hardware damage — not just the simple circuit problems that affect a physical flashlight.
Why Is My iPhone Flashlight Not Working?
The most common reasons an iPhone flashlight stops working include the camera app being open in the background, Low Power Mode being active, the phone overheating, or a software glitch following an iOS update.
Start by closing all background apps — particularly the Camera app, Instagram, Snapchat, TikTok, or any QR code scanner. These apps access the camera hardware and can block the flashlight function entirely.
If closing apps does not help, restart the iPhone. A restart clears temporary memory and resolves most minor software glitches. Check if Low Power Mode is active under Settings > Battery and turn it off if needed.
How to Fix iPhone Flashlight Step by Step
Close all background apps by swiping up from the bottom of the screen and dismissing every open application.
Restart the phone by holding the side button and a volume button until the slide-to-power-off slider appears.
Disable Low Power Mode under Settings > Battery.
If the flashlight icon is grayed out, go to Settings > Control Center > remove the Flashlight tile, restart the phone, then re-add it.
Update iOS to the latest version, as software bugs affecting the camera module are often patched in OS updates.
Why Is My Android Flashlight Not Working?
Android torch failures follow a very similar pattern to iPhone issues. The most frequent causes are Battery Saver mode being active, a conflicting camera or torch app running in the background, overheating, or physical damage to the camera module.
On Android, Battery Saver mode cuts power to non-essential features including the flashlight. Disable it via Settings > Battery > Battery Saver and test the torch again.
Force-close the Camera app and any third-party camera or torch applications. Then restart the device and test the flashlight from the Quick Settings panel.
Phone Flashlight Not Working After a Drop
If your phone flashlight stopped working after the phone was dropped, the most likely cause is physical hardware damage to the camera module.
The flashlight LED sits inside the camera module and is connected to the main logic board by a small, fragile ribbon cable. A drop — even a minor one — can partially disconnect this cable or crack the LED.
If a factory reset does not restore the flashlight, the problem is hardware and requires professional repair. Do not attempt to open the phone yourself, as doing so can cause additional damage.
Rechargeable Flashlight Not Working: What to Check
Rechargeable flashlights — particularly those using 18650 lithium-ion batteries — have a few additional failure modes that disposable battery flashlights do not.
If a rechargeable flashlight is not turning on, check the charge level first. A completely depleted lithium battery may not trigger the charging indicator or show any sign of life until it has received at least a small charge.
Connect the flashlight to a reliable charger and look for an indicator light. If no charging light appears, the charging port, cable, or internal charging circuit may be faulty.
Battery Life in Rechargeable Flashlights
Rechargeable lithium batteries have a finite number of charge cycles — typically 300 to 500 full cycles before significant capacity loss occurs.
If the flashlight’s runtime has dropped to less than 30% of its original performance, the battery has likely reached end-of-life and needs replacement. Most reputable flashlight brands sell replacement battery cells for their models.
Using a low-quality charger can also damage lithium cells over time. Always use the charger supplied by the manufacturer or a trusted aftermarket equivalent with the correct voltage and current specifications.
Flashlight Flickering: What It Means and How to Fix It
A flickering flashlight is not random — it almost always signals a specific underlying problem. Understanding the cause makes the fix straightforward.
The most common causes of flickering are dirty or corroded battery contacts, a weak or flattened battery spring, a partially discharged battery, a loose battery fit in an oversized compartment, and moisture causing an intermittent short circuit.
Start with the simplest fix: clean the contacts, stretch the spring back to full tension, and insert fresh batteries. If flickering continues after these steps, inspect for moisture or loose internal connections.
LED Flashlight vs Incandescent Flashlight: Different Failure Patterns
LED and incandescent flashlights fail in different ways. Understanding the difference helps you diagnose the problem faster.
| Factor | LED Flashlight | Incandescent Flashlight |
|---|---|---|
| Bulb lifespan | 20,000–100,000 hours | 15–20 hours |
| Common failure | Contacts, spring, driver | Bulb filament, contacts |
| Dimming behavior | Sudden dropout | Gradual fading |
| Repair difficulty | Easy to moderate | Easy |
| Replacement parts | LED module (if available) | Standard bulb |
Incandescent flashlights dim gradually as batteries drain. LED flashlights tend to maintain full brightness until power drops too low, then cut out abruptly. This difference is important when diagnosing a “dying” flashlight.
When to Repair vs Replace a Flashlight
Not every broken flashlight is worth repairing. Knowing when to fix and when to replace saves time and money.
As a general rule, if the repair cost exceeds 50% of the original purchase price of the flashlight, replacement is the smarter investment — especially since modern LED flashlights deliver far better brightness, battery efficiency, and durability than older models at very affordable prices.
Simple fixes — battery replacement, contact cleaning, spring adjustment — are always worth doing. Expensive repairs like driver circuit replacement or custom LED module sourcing are rarely cost-effective for mid-range or budget flashlights.
Quick Diagnostic Checklist
Before spending time or money on a repair, run through this checklist in order. Most flashlight problems are solved within the first three steps.
| Step | What to Check | What to Do |
|---|---|---|
| 1 | Batteries | Replace with fresh batteries |
| 2 | Orientation | Confirm + and − alignment |
| 3 | Contacts | Clean corrosion with vinegar or alcohol |
| 4 | Switch | Click rapidly, clean with contact cleaner |
| 5 | Battery spring | Stretch gently to restore tension |
| 6 | Lockout mode | Hold button 5–10 seconds to disengage |
| 7 | Bulb or LED | Inspect, replace if faulty |
| 8 | Water damage | Dry completely, replace O-rings |
| 9 | Internal wiring | Professional repair or replacement |
Tips for Storing Your Flashlight Long-Term
How and where you store a flashlight has a direct impact on how reliably it works when you need it.
Always remove batteries before long-term storage. This is the single most effective thing you can do to prevent corrosion damage. Even quality batteries can leak over months or years when left installed.
Store the flashlight and its batteries separately in a cool, dry environment. A sealed plastic bag with a silica gel desiccant packet inside is ideal for preventing moisture buildup.
Test your flashlight every three to six months even if you have not used it. This habit ensures you catch any battery or contact issues before a real emergency arises.
Choosing a More Reliable Flashlight in 2026
If your current flashlight has become unreliable, upgrading to a better model is often the most practical solution. Modern LED flashlights are more dependable, brighter, and longer-lasting than ever before.
Look for flashlights with aircraft-grade aluminum bodies, multiple O-ring seals, and a reputable LED chip from brands like Cree or Luminus. Models with USB-C rechargeable batteries eliminate the need to buy disposable cells.
Tactical flashlights with a simple one-button interface are less prone to accidental lockout than complex multi-mode lights. Avoid very cheap, no-brand flashlights — their contacts and switches tend to fail quickly and cannot be repaired cost-effectively.
Frequently Asked Questions (FAQs)
Why is my flashlight not working even with new batteries?
New batteries alone do not fix the problem if the issue is corroded contacts, a faulty switch, or a damaged bulb. Inspect and clean all contact points before assuming the batteries are the only cause.
Why is my phone flashlight not working?
The most common causes are the Camera app running in the background, Low Power or Battery Saver mode being active, the phone overheating, or a software glitch. Restart the phone and close all background apps first.
How do I fix corroded battery contacts in a flashlight?
Remove the batteries and scrub the corroded terminals with a cotton swab dipped in white vinegar or isopropyl alcohol. Wipe dry completely and insert fresh batteries once all residue is cleared.
What is lockout mode on a flashlight?
Lockout mode is a built-in feature on tactical flashlights that prevents accidental activation in a bag or pocket. It is disengaged by holding the power button for 5–10 seconds or following a specific button sequence in the user manual.
Why is my LED flashlight flickering?
Flickering almost always means an inconsistent power supply — dirty or corroded contacts, a weak battery spring, or a partially discharged battery. Clean the contacts, stretch the spring, and try fresh batteries.
Why is my rechargeable flashlight not charging?
Check the charging cable and port for damage or debris. If no charging indicator light appears, the charging circuit or battery may be faulty. Lithium batteries have a lifespan of 300–500 cycles and may need replacing.
Why did my flashlight stop working after I dropped it?
A drop can loosen the internal battery spring, disconnect wiring, or crack the LED driver circuit even when the casing looks fine. Open the battery compartment, check the spring tension, and inspect for any visible internal damage.
Is it worth repairing a broken flashlight?
If the repair involves simple steps like cleaning contacts or stretching a spring, absolutely yes. If the driver circuit or LED module needs replacing and the cost exceeds 50% of the flashlight’s original value, replacement is usually the smarter option.
Why is my iPhone flashlight greyed out?
The flashlight is greyed out on iPhone when the camera app is open, Low Power Mode is active, or the phone is overheating. Close all camera-related apps, disable Low Power Mode, and let the phone cool down.
How do I prevent my flashlight from stopping working?
Remove batteries during long-term storage, store in a cool dry place, clean contacts regularly, and use quality batteries. Test the flashlight every few months to catch any issues before an emergency arises.
Conclusion
Why is my flashlight not working has a clear, fixable answer in the vast majority of cases.
Dead batteries, corroded contacts, a stuck switch, a flattened spring, and an activated lockout mode account for almost every flashlight failure you are likely to encounter.
Phone torch problems follow a different path — tied to software conflicts, overheating, or camera module damage — but are equally solvable with the right steps.
Work through the diagnostic checklist in order and you will identify the problem in minutes. Fix the simple things first.
Clean the contacts, replace the batteries, check the orientation, and disable lockout mode before assuming something is seriously wrong. In most cases, that is all it takes.
For flashlights that are beyond repair, upgrading to a modern LED model is affordable and worthwhile.
A reliable flashlight is one of the most important tools you can own — and in 2026, there has never been a better selection available at every price point.
Keep yours maintained, stored correctly, and tested regularly so it is ready the moment you actually need it.