

The Last-Minute Event Registration Kit: Express Lanyards, Badges and Essential Signage
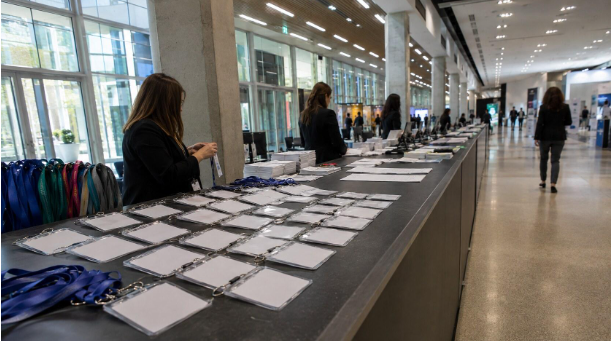
A well-planned registration zone combines badges, lanyards, check-in tools and clear visitor flow.
Registration is often the first real interaction a visitor has with an event. When it works, people collect their credentials, understand where to go and enter the venue without thinking about the process. When it fails, queues build quickly, staff begin improvising and the event feels disorganised before the programme has even started.
The challenge becomes sharper when attendee numbers change late, badge data arrives behind schedule or materials are needed in another city within a few days. The answer is not to recreate a perfect registration system at the last minute. It is to identify the essential components, remove unnecessary complexity and build a kit that can still operate when the plan changes.
1. Start with the minimum viable registration system
Before ordering anything, define what the registration desk must achieve. Most events need to verify a name, issue a badge, identify the attendee type and direct the visitor towards the correct entrance or session. Everything else should support those four tasks.
Create one final attendee spreadsheet with consistent columns for first name, surname, company, role and access category. Remove duplicate records and decide who is authorised to approve additions. If several teams keep separate versions, the production file can become outdated within hours. One controlled master list is far more valuable than a complicated platform that nobody owns.
2. Design badges around the information staff actually need
A badge has two jobs: it identifies the attendee and communicates access information. Names should be readable at conversational distance, while secondary details such as company, job title or ticket category should remain clearly subordinate. Small typography, decorative backgrounds and too many fields make badges slower to check.
Use colour carefully. A coloured strip or corner can distinguish speakers, exhibitors, press, crew and visitors without turning every badge into a different design. If access categories are sensitive, use discreet symbols or short codes rather than colours that publicly identify VIP status. Always test the badge inside the actual holder, because clips and seams can hide information placed too close to an edge.
3. Treat lanyards as operational equipment
Lanyards are visible branding, but their practical details matter just as much. The width should suit the artwork, the attachment must fit the badge holder and the total drop length should keep the credential easy to scan. Safety breakaways may be appropriate for crowded venues, production environments or events where equipment is being moved.
When time is extremely limited, source express lanyards and event badges through an urgent event-production workflow. For standard lanyards specifically, some specialist suppliers can offer a 6-12 hour production window and dispatch within 24 hours, subject to capacity, artwork approval and the selected specification. That speed is useful only when the file is genuinely ready: confirm the size, colour mode, print area, attachment and quantity before production begins.
For mixed attendee groups, a single lanyard design is normally easier to manage than several colour variants. Let the badge communicate access status unless separate lanyards have a clear operational purpose. Keep a small quantity unprinted or generic for unexpected guests, replacement badges and staff arriving from another location.

Badge holders, attachments and lanyards should be checked as one connected system before production.
4. Use signage to prevent questions before they reach the desk
Registration signage should answer the questions people ask while they are still walking: Is this the correct entrance? Which line should I join? Where do speakers or exhibitors check in? Where do I go after collecting my badge? A beautiful sign that appears too late in the visitor journey cannot prevent a queue.
Place the first directional sign before the registration area is visible, particularly when the venue has several entrances. At the desk, use large lane labels and keep messages short. Reprintable inserts or simple poster frames are useful when names and categories may change. The visual system should repeat the same colours, type style and symbols used on badges, staff clothing and the main event backdrop.

Wayfinding works best when visitors can understand the route before they reach the registration queue.
5. Build the desk around the queue, not around the furniture
A long counter may look impressive, but it does not automatically create an efficient check-in process. Give each position one clear task: search, badge collection, correction or problem solving. Move complex cases away from the main queue so one missing record does not stop everyone behind it.
Sort badges alphabetically in small, labelled groups rather than one large stack. Keep spare holders, clips, lanyards and blank badges within reach, but remove open cartons and production packaging from the visitor-facing area. A compact layout with clear roles generally performs better than a larger desk where every staff member handles every problem.
6. Coordinate registration materials with the wider event
The registration zone should not feel like a temporary administrative corner disconnected from the event. The backdrop, counter graphics, directional signs, staff apparel and credentials should share the same basic visual language. This does not require every item to be produced in the same material; consistent colour, spacing and logo use are usually enough.
When the entrance setup is part of a larger exhibition build, coordinating exhibition and event supplies through one production plan can reduce mismatched colours, duplicated shipping and incompatible dimensions. It also makes last-minute prioritisation easier: credentials and essential signs can move first, while decorative items follow on a separate schedule if necessary.
7. Prepare a recovery kit for predictable failures
Last-minute preparation should include recovery tools, not only finished materials. Pack blank badge cards, spare holders, clips, generic lanyards, permanent markers, removable tape, cable ties, scissors, extension leads and a printed attendee list. If badges are being printed on site, bring spare consumables and test the printer using the final badge stock before leaving for the venue.
Assign one person to control corrections. Handwritten changes are sometimes unavoidable, but they should be recorded so the attendance data remains accurate. A simple correction sheet prevents several staff members from fixing the same record in different ways.
The final 24-hour check
- Freeze the master attendee file and record any later additions separately.
- Count badges, holders and lanyards by attendee category, then add a practical reserve.
- Test one complete badge-and-lanyard set for fit, readability and scanning.
- Photograph the intended registration layout so venue staff can recreate it.
- Pack signage in installation order, with the first required sign on top.
- Confirm the delivery contact, venue access point and on-site telephone number.
A fast setup can still feel considered
Urgency does not have to produce a visibly improvised result. A controlled data file, readable badges, correctly specified lanyards, early wayfinding and a small recovery kit solve most of the problems visitors actually notice. The best last-minute registration systems are not the most elaborate; they are the ones that make the next action obvious for both attendees and staff.
About the author: Nesheli is a Belgium-based provider of event branding, exhibition graphics, printed signage, lanyards, badges, staff apparel and promotional materials for events across Europe.